
In this tutorial, we will go through the setup process and the main development tasks to create a Codeigniter 4 application from scratch. CodeIgniter is a PHP application development framework featuring a small footprint and great documentation. However, it’s simple and flexible enough to let you choose your way to work. It provides simple configuration and helpful tools for common development tasks.
Codeigniter 4 uses the MVC (Model-View-Controller) approach, which allows great separation between data, business logic, and presentation. Its flexibility allows you to use Codeigniter to implement a RESTful API or a WebSocket server interface. For Laravel users, it provides a similar approach in the toolset, with the php spark command line features (similar to php artisan in Laravel). Additional libraries like Blade templates can be easily included. It supports Routing, request Filtering (CSRF, Authentication, Rate limit)
About the Model-View-Controller Pattern
MVC s a software architectural pattern for applications that divides the program logic into three elements with separate objectives and defined interactions:
- A model is responsible for managing the data of the application. It receives user input from the controller. They directly manage data sources, business logic, and rules of the application.
- A view is the visual representation of a combination of models in a particular format. For example, an HTML page, a web form, or a JSON/XML file.
- A controller responds to the user input and performs interactions on the data model objects. The controller receives and validates the input (request) to perform model operations. It sends a response using a composition of views.
Steps to create a Codeigniter 4 application
Those are the main steps to set up and create the Codeigniter application
- Create the Codeigniter project folder
Use manual installation from zip file or via PHP composer
- Setup the .env file
Copy the default env file into a
.envfile to setup the environment and database connection - Start the local web service for development
Run
php spark serveto start the service and go tohttp://localhost:8080to see the default site. - Modify or create your home page
Modify
app/Views/welcome_message.phpto create your custom home page. Add additional css and javascript files in thepublicfolder. - Create Migrations (table schema)
Run
php spark make:migration MigrationNameand modify the fileapp/Database/Migrations/{TIMESTAMP}_MigrationName.phpto create a table, fields and indexes in theup()method. Put rollback actions (drop table/field) in thedown()method. - Run the migration
Call
php spark migrateto run the migration and create the table in the database - Create Seeders (table data)
Run
php spark make:seeder SeederNameand edit the fileDatabase/Seeds/SeederName.phpto clear and populate the table with initial data. - Run the seeder
Call
php spark db:seed SeederNameto insert data into the seeder table. You can see the table data using the commandphp spark db:table [tablename] - Create a BaseModel class
Create
app/Models/BaseModel.phpextending fromCodeigniterModel. This will help to add common methods for all models created. - Create Models
Run
php spark make:model ModelNameto create a model class associated with the database table. Edit the fileapp/Models/ModelName.phpto setup the model’s$allowedFields, and$validationRules. - Create Controllers
Run
php spark make:controller ControllerNameto create a controller class. Edit the fileapp/controllers/ControllerName.phpto implement methods, likeindex(), in order to display a list of models. - Create Routes to Controllers
Add entries to
app/Config/Routes.phpcalling$routes->get('/path', 'Controller:method');
For controllers with parameters use$routes->get('/path', 'Controller:method'); - Create and extend Helpers
Create or extend helpers libraries adding files to
app/Helpers/name_helper.phpand load helper libraryes by name usinghelper('name')or load them automatically in controllers, modifying the$helpersproperty. - Create a common page layout
Create a view file in
app/Views/layouts/default.phpto include the page HTML code. Setup section placeholders with name:$this->renderSection('{section name}'). In a view, call first$this->extend('layouts/default')to load the layout, and then define section contents with$this->section('{section name}')at the start of the section and$this->endSection()at the end.
Installing Codeigniter 4
Create a Codeigniter 4 Application using the manual method (downloading the PHP code package and unzipping contents) or using the PHP Composer utility. In any case, soon or later you will be using composer to install additional components, so the composer alternative is recommended to ensure an updated project codebase.
Install prerequisites
- PHP 7.2.5+ (https://www.php.net/manual/en/install.php)
- Composer (https://getcomposer.org/doc/00-intro.md)
- Optionally, a Database engine like MySQL or PostgreSQL
Create a Codeigniter 4 project
- Follow instructions from https://codeigniter4.github.io/userguide/installation/
- Manual Installation:
- Download the Codeigniter zip file from https://github.com/CodeIgniter4/framework/releases/latest
- Note: Updates to the Codeigniter codebase should be done manually
- Install via composer
- Run
composer create-project codeigniter4/appstarter [foldername] - To update the Codeigniter codebase, run
composer update
- Run
Folder Structure
The project folder will contain this main project structure for the Codeigniter 4 Application:
- app: Application internal components
- Config: configuration files.
- Database: database schema Migrations and data Seeds
- Models: application models.
- Views: application views.
- Controllers: application controllers.
- Helpers: global libraries with utility functions
- Filters: actions either before or after a controller execution
- public: the public application folder, including the entry page (index.php) and any public static resources (eg: js, css, fonts)
- tests: unit test files. See
README.mdfile inside for more information. - vendor: libraries loaded by composer
- writable: application modifiable files (cache, logs, session) and user uploads
Important files in the root project folder:
- composer.json: composer package dependencies
- composer.lock: records current composer package versions
- env: environment file template.
- spark: the command line interface (run
php spark)

Setup the .env file
- Copy the
envfile in the root folder as a.envfile (dot at the start) - Uncomment
CI_ENVIRONMENTand set todevelopment - To set up an SQLite database, uncomment and set the driver and filename:
database.default.DBDriver = SQLite3database.default.database = database.sqlite- The database file will be stored in the
/writablefolder
- If you want to set up a MySQL database, uncommend and edit:
- database.default.hostname = {MySQL host}
- database.default.database = {database name}
- database.default.username = {mysql user}
- database.default.password = {mysql password}
- database.default.DBDriver = MySQLi
- database.default.DBPrefix =
- database.default.port = 3306
- For this tutorial, we will use the SQLite database for a simple setup
Start the local web service
To start the web service use the PHP spark command line utility and run from the project root folder:
php spark serve
- This command will start a local HTTP server service for your application.
- You can access it at http://localhost:8080/
- Press Ctrl+C in the console to stop the server
- To use a different port, run
php spark serve --port PORTNUMBER - Your browser will display the default Codeigniter 4 welcome page.

As you can see, there is a floating gray “Debug Bar” at the bottom of the screen. It can be collapsed by clicking the x icon button. However, this toolbar is only enabled when the .env file CI_ENVIRONMENT variable value is development. In a production environment, this and other development features will be disabled.
Create your home page
You can modify app/Views/welcome_message.php (or create a new view file app/Views/home.php) to start your first home page for the web application.
- Include your own HTML code
- If you want to change the file name of the home view to
app/Views/home.php- Modify the controller
app/Controllers/Home.phpto returnview('home')instead ofview('welcome_message').
- If you created a new file, remove the old view
app/Views/welcome_message.php
- Modify the controller
- Include any static files user by your view in the
publicfolder.
This is a simple home for our Codeigniter 4 web application:
<!DOCTYPE html>
<html lang="en">
<head>
    <meta charset="UTF-8">
    <title>My Home Page</title>
    <meta name="description" content="Codeigniter4 web application home page">
    <meta name="viewport" content="width=device-width, initial-scale=1.0">
    <link rel="shortcut icon" type="image/png" href="/favicon.ico"/>
    <link rel="stylesheet" href="/css/style.css" >
</head>
<body>
<header>
    <div>My Home Page</div>
    <nav></nav>
</header>
<main>
    Main Page Content
</main>
<footer>
    Site Footer
</footer>
</body>
</html>
And create a small CSS file we can store in the public folder (eg: public/css/style.css). Any other static file should be stored in that folder.
html, body {
font-family: Helvetica, Arial, sans-serif;
font-size: 16px;
margin: 0;
padding: 0;
min-height: 100vh;
display: flex;
flex-direction: column;
}
header{
background-color: #eee;
line-height: 3em;
padding: 0 1rem;
display: flex;
justify-content: space-between;
}
main{
padding: 1rem;
flex: 1;
}
footer{
background-color: #444;
color: #eee;
line-height: 3em;
padding: 0 1rem;
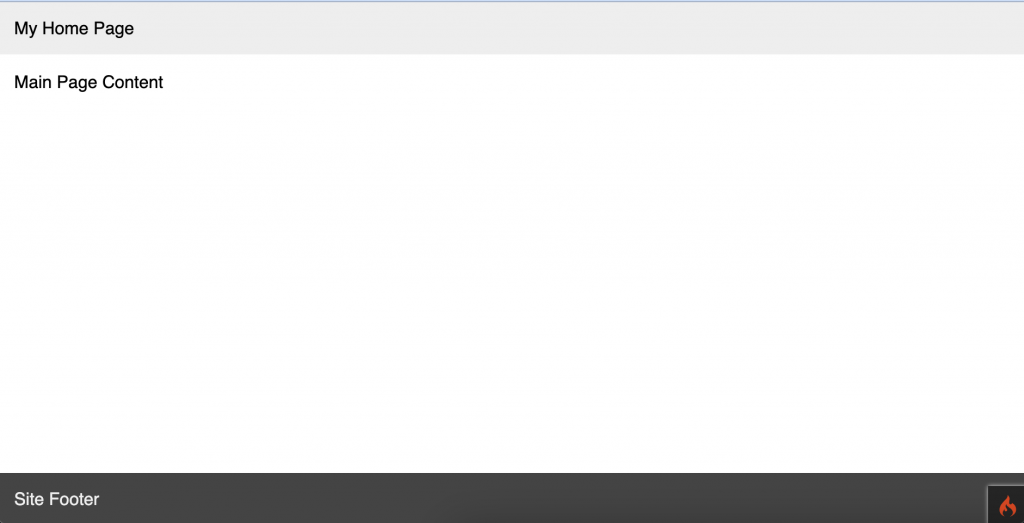
}The resulting page will look like this screen:
Working with data – Migrations, Models, and Seeds
First, we will work with our database to create tables and data associated. When we create a Codeigniter 4 application, there are 3 main elements we need to create:
- MIgrations: To set up and define de database tables (schema), including operations like create, alter, and drop tables, columns and indexes.
- Seeds: To program and populate table data for regular operation and for tests.
- Models: To create an abstract data interface to be used in views and controllers.
Create a Migration File
We create migrations to create and modify database tables. Basically, they work as single execution units in sequential order (alphabetically by file name) and can be reverted (rollback) with a similar definition. The following examples will illustrate the way migrations work.
- To create a new migration run the command php spark make:migration MigrationName
- Eg:
php spark make:migration CreateUsers
- Eg:
- A file will be created in
app/Database/Migrations/{TIMESTAMP}_CreateUsers.php - The timestamp created allows keeping a sequential order of execution
- Each migration file has an
up() anddown() method. The up() method is executed once when running the migration (to create tables, fields, and indexes). Thedown() method is used to rollback the actions performed by the migrationupmethod (drop tables, fields, indexes) - The common operations for migrations are:
- Add fields. Field config can have
type,constraint(size) ,null(nullable) and other properties.$this->forge->addField(["fieldname"=>["type"=>'TYPE',constraint=>SIZE]]); - Setup the primary key
$this->forge->addKey('fieldname', true); - Create a unique key
$this->forge->addUniqueKey(['field1','field2']); - Finally, create the table
$this->forge->createTable('tablename');
- Add fields. Field config can have
- Operations to rollback changes:
- Drop table
$this->forge->dropTable('tablename'); )$this->forge->dropTable('tablename',true); // drop if exists$this->forge->dropTable('tablename',true, true); // if exists + cascade - Remove columns
$forge->dropColumn('table_name', ['column_1', 'column_2']);
- Drop keys
$forge->dropKey('tablename', 'index_name');
- Drop table
Migration example: Users table
This is an example of the migration file /app/Database/Migrations/2022-12-24-044145_CreateUsers.php
<?php

namespace AppDatabaseMigrations;
use CodeIgniterDatabaseMigration;

class CreateUsers extends Migration
{
    public function up()
    {
        $this->forge->addField([
            'id' => [
                'type'           => 'INT',
                'unsigned'       => true,
                'auto_increment' => true,
            ],
            'email' => [
                'type'           => 'VARCHAR',
                'constraint'     => 64,
            ],
            'password' => [
                'type'           => 'VARCHAR',
                'constraint'     => 32,
            ],
            'user_type' => [
                'type'           => 'INT',
                'default'        => '0',
            ],
            'login_at' => [
                'type'           => 'DATETIME',
                'null'           => true,
            ],
        ]);
        $this->forge->addKey('id', true);
        $this->forge->addUniqueKey(['email']);
        $this->forge->createTable('users');
    }

    public function down()
    {
        $this->forge->dropTable('users');
    }
}
Run the first migration
To run the migration use the command php spark migrate.
- This will run any pending migration not yet executed.
- If you run the command again, without creating a new migration, no migration will be executed.
- For the first migration, in this case, the database will be also created (in this case an SQLite database in
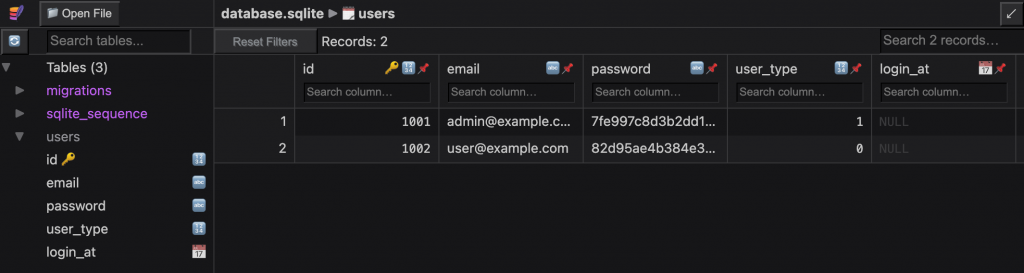
writable/database.sqlite). You can open this file in an SQLite database viewer (eg: sqliteviewer.app) - After this migration, you will see the
userstable created in the database

Create a Database Seeder (Table data)
Now we have an empty users table. After that, the next step is to populate the table with some example users. To create a new seed, run the command php spark make:seeder SeedName
- Example:
php spark make:seeder UsersData - A new seed file will be created at
Database/Seeds/UsersData.php - To insert data, call:
$this->db->table('tablename')->insert($data); $datais a key => value structure with table row values. To insert data you need values for each non-null field, except foridif it’s set to AUTO INCREMENT.
Seed Example: Users data
This is a seed file example for users data stored in Database/Seeds/UsersData.php. This will populate the table with 2 users: admin and regular user.
<?php

namespace AppDatabaseSeeds;

use CodeIgniterDatabaseSeeder;

class UsersData extends Seeder
{
    public function run()
    {
        // clear data
        $this->db->table('user')->truncate();
        $this->db->table('users')->insert([
            "id" => 1001,
            "email" => "admin@example.com",
            "password" => md5("Admin.123"),
            "user_type" => 1, // admin type
        ]);
        $this->db->table('users')->insert([
            "id" => 1002,
            "email" => "user@example.com",
            "password" => md5("User.123"),
            "user_type" => 0, // regular user
        ]);
    }
}
You can see the passwords were stored using a MD5 hash function to avoid storing plain text passwords. There are other options to add security to the password storage. Eg: using a salt (additional random data).
Run the seeder
To insert the data we added, run the seeder with command php spark db:seed SeedName. In this case we run php spark db:seed UsersData. Now you can see the data in the SQLite explorer (open the database.sqlite file again from sqliteviewer.app)
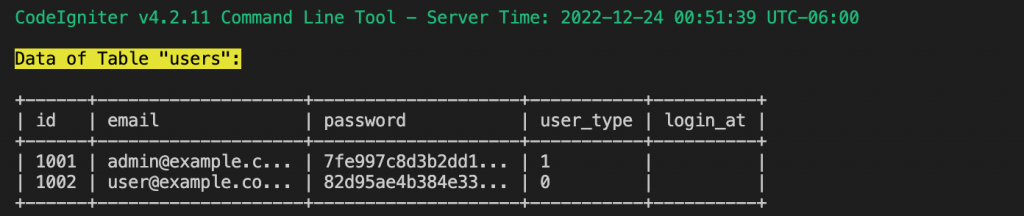
You can also explore the database locally, using the command php spark db:table [tablename]. For example, to see the data of the users table, run php spark db:table users:
Create a Base Model
Sometimes you will need to make implementations of the same functionality in all models. When you create a Codeigniter 4 application, it’s preferable to put those common methods in a BaseModel class and then extend any new model from this BaseModel. Create this file in app/Models/BaseModel.php
<?php

namespace AppModels;

use CodeIgniterModel;

class BaseModel extends Model
{
    // put here any common model method or attribute
}
Create a Model
Now we can create the model class associated to allow the application controller to request or set data. By running php spark make:model ModelName you can create the model file and edit its contents in app/Models/ModelFile.php. However, it’s recommended that ModelName should match the table name in CamelCase, so for users table, we’ll use Users class name, and UserType for user_type table. Some common elements to define are:
$table: is the real name of the table in the database. Sometimes the model could be named in plural (eg: Users) but the database table is singular (tableuser)- $allowedFields: define which fields of the table could be edited by the user. Generally, we exclude the table id field and any automatic or internal fields (like creation and update timestamps)
- $validationRules: a set of validations to help the controller to check whether the data to be inserted or updated follow the rules or not. Some examples of rules are:
required,max_length,valid_emailand others. More info on validations is in the Codeigniter 4 documentation. - Also, change
extends Modeltoextends BaseModelto use the common Base Model class.
Model Example: Users Model
This is an example of Users model generated with php spark make:model Users. Edit the file app/Models/Users.php to add the $allowedFields and $validationRules based on the current table fields:
<?php

namespace AppModels;

use CodeIgniterModel;

class Users extends BaseModel
{
    protected $DBGroup          = 'default';
    protected $table            = 'users';
    protected $primaryKey       = 'id';
    protected $useAutoIncrement = true;
    protected $insertID         = 0;
    protected $returnType       = 'array';
    protected $useSoftDeletes   = false;
    protected $protectFields    = true;
    protected $allowedFields    = [
        'email',
        'password',
        'user_type',
        'login_at',
    ];

    // Dates
    protected $useTimestamps = true;
    protected $dateFormat    = 'datetime';
    protected $createdField  = 'created_at';
    protected $updatedField  = 'updated_at';
    protected $deletedField  = 'deleted_at';

    // Validation
    protected $validationRules      = [
        'email' => [
            'label' => 'Email',
            'rules' => 'required|max_length[64]|valid_email|is_unique[email]'
        ],
        'password' => [
            'label' => 'Password',
            'rules' => 'required|max_length[32]'
        ],
        'user_type' => [
            'label' => 'User Type',
            'rules' => 'required|greater_than_equal_to[0]'
        ],
    ];
    protected $validationMessages   = [];
    protected $skipValidation       = false;
    protected $cleanValidationRules = true;

    // Callbacks
    protected $allowCallbacks = true;
    protected $beforeInsert   = [];
    protected $afterInsert    = [];
    protected $beforeUpdate   = [];
    protected $afterUpdate    = [];
    protected $beforeFind     = [];
    protected $afterFind      = [];
    protected $beforeDelete   = [];
    protected $afterDelete    = [];
}
Working with Controller and Routes
We will create a Controller to manage web requests. As you can see, Codeigniter 4 has already created app/Models/BaseController.php to allow implementation of common controller methods and attributes for your application. Additionally, we need to create Routes to map a web URL to controller methods.
Create a Controller
To create a controller run the command php spark make:controller ControllerName and edit the file created in app/Controllers/ControllerName.php.
- Your controller class extends from
BaseController. - Edit the
index()method to configure the response for the default request.- Get a reference to the model
$model = new AppModelsUsers(); - Retrieve all rows from the model
$items = $model->findAll(); - Return a response with model data
- Directly return content. For example, JSON data
return $this->response->setJSON($items); - Return a view (you need to create the view file in
app/views/users/index.php)return view('users/index', ['items' => $items]);
- Directly return content. For example, JSON data
- Get a reference to the model
- If you want to change the base controller to work as a RESTful controller:
- Change
use AppControllersBaseControllertouse CodeIgniterRESTfulResourceController - Change
extends BaseControllertoextends ResourceController - Setup the source
$modelNameprotected $modelName = 'AppModelsModelName';
- Setup the output format (generally, JSON)
protected $format = 'json';
- For the
indexmethod usereturn $this->respond($this->model->findAll());
- Change
Controller Basic Example: Users List
This is a basic controller example for users. Run php spark make:controller Users and edit the file app/Controllers/User.php with this content:
<?php

namespace AppControllers;

use AppControllersBaseController;

class Users extends BaseController
{
    public function index()
    {
        $model = new AppModelsUsers();
        $items = $model->findAll();
        return $this->response->setJSON($items);
    }
}
This controller will respond with JSON content for the users table data.
Setup a Route for the controller
To create a route we edit the file app/Config/Routes.php to add routes to controller methods. There is only one default route already declared. It’s the default route to the root path of the website ‘/‘, pointing to the Home controller.
$routes->get('/', 'Home::index');
To add additional routes:
- Use
$routes->get('/path/','Controller::method');for common requests (GET method) - Use
$routes->post,$routes->delete,$routes->putfor other methods - To pass parameters to the controller:
- Use parameters in the path like
(:any)for text and(:num)to enforce numbers - Pass parameters to the controller as
$1,$2, etc. - Example:
$routes->get('/user/(:num)','User::show/$1');
- Use parameters in the path like
For example to add a route to the User controller, method index(), add the following line
$routes->get('/users', 'Users::index');
Now, we can test http://localhost:8080/users and we’ll get a response from the User controller’s index() method:

Helpers to the rescue
At this point, we should normally need some help from additional libraries to process, render and return content. Helpers are a special type of library containing specific features used to create a Codeigniter 4 application. They can be easily loaded at runtime by calling:
helper('helpername'); // single helperhelper(['helper1','helper2']); // multiple helpers
This will load any function or class created by those helpers. Some common helpers already available are:
array: Array processing functions likearray_sort_by_multiple_keys($array, $columns)to search, sort, and format arrays. See Array Helper in the Codeigniter 4 documentationfile: To get some file information (eg:get_file_info()) and perform file operations (write_file($path, $data, $mode).html: HTML generation shortcut functions to generate different HTML tags likeul,link,imgand others. More information is in the HTML helper documentation.form: A set of HTML form utilities to create a form likeform_open()andform_close(). Also HTML controls likeform_input(),form_dropdown(), andform_button().
If you want a controller to automatically load some helpers at startup, setup the $helpers attribute:
class Users extends BaseController
{
    protected $helpers = ['html', 'form'];
}
Adding and extending helpers
To add, or extend existing helpers, create a file in app/Helpers/name_helper.php.
In this example, we extend the HTML Helper (creating app/Helpers/html_helper.php) to add functions to create HTML tables from database results (array of rows):
<?php

/**
 * Generate HTML attributes from array
 */
function htmlAttributes($attrs=[]){
    $content = [];
    foreach($attrs as $attr=>$value){
        $content[] = "$attr="$value"";
    }
    return implode(' ',$content);
}

/**
 * Generate HTML table cell (td or th)
 */
function htmlCell($cell,$cellTag="td"){
    return "<$cellTag>$cell</$cellTag>";
}

/**
 * Generate HTML table row (tr)
 */
function htmlRow($row,$cellTag="td"){
    if (!$row) return "";
    $cols = [];
    foreach($row as $col){
        $cols[] = htmlCell($col,$cellTag);
    }
    $content = implode("n",$cols);
    $template = "<tr>
        $content
    </tr>";
    return $template;
}

/**
 * Generate HTML table
 * @param array $columns Custom column names
 * @param array $attrs HTML Table attributes
 */
function htmlTable($data, $columns=null, $attrs=[]){
    if (!$columns){
        $columns = array_keys($data[0]);
    }
    $thead = htmlRow($columns,"th");
    $rows = [];
    foreach($data as $row){
        $rows[] = htmlRow($row);
    }
    $tbody = implode("n",$rows);
    $attrs = htmlAttributes($attrs);
    $template = "<table $attrs>
        <thead>$thead</thead>
        <tbody>$tbody</tbody>
    </table>";
    return $template;
}
Now we can use these helper functions to modify the User controller (app/Controllers/User.php) and return an HTML table instead of JSON data:
<?php
namespace AppControllers;
use AppControllersBaseController;
class Users extends BaseController
{
protected $helpers = ['html'];
public function index()
{
$model = new AppModelsUsers();
$items = $model->findAll();
return view('users/index',[
"items"=>$items
]);
}
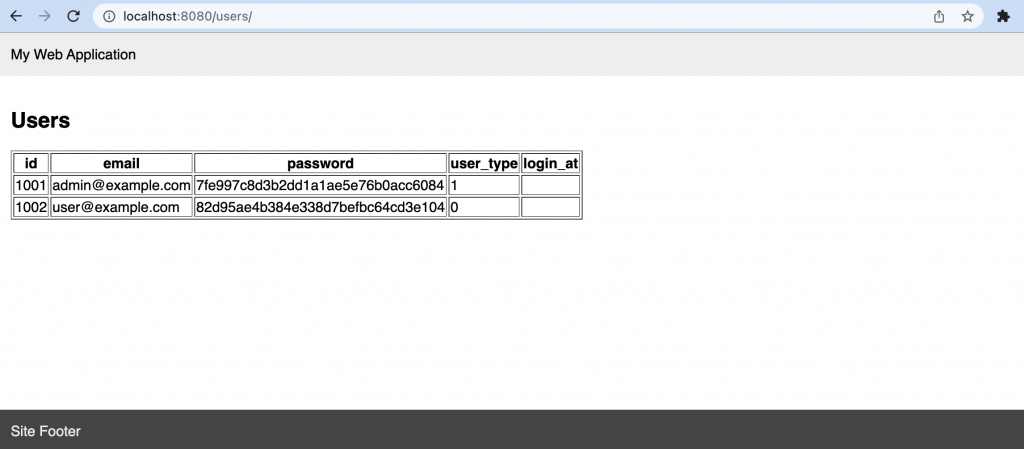
}Now we can see the resulting page at http://localhost:8080/users/

Creating and Customizing Views
When we create a Codeigniter 4 application, we create views to display information from controllers. Our views are php files stored in app/Views/path/to/view.php folder and loaded from a controller or another view using view('path/to/view').
To keep views organized, we store them in sub-folders inside app/Views. This way, we can group views from the same controller in a single folder and use standar names for each one.
View example: Users
We create the app/Views/users folder and then create a index.php file to call it from the index() method. For any other controller methods we will use the same name for the view to keep it consistent. This is a simple example of view with a header and a data table in app/Views/users/index.php (using the same page structure of the home view we created before in app/Views/home.php)
<!DOCTYPE html>
<html lang="en">
<head>
    <meta charset="UTF-8">
    <title>Users</title>
    <meta name="viewport" content="width=device-width, initial-scale=1.0">
    <link rel="shortcut icon" type="image/png" href="/favicon.ico"/>
    <link rel="stylesheet" href="/css/style.css" >
</head>
<body>
<header>
    <div>My Web Application</div>
    <nav></nav>
</header>
<main>
    <h2>Users</h2>
    <?php
    helper('html');
    echo htmlTable($items,null,["border"=>1]);
    ?>
</main>
<footer>
    Site Footer
</footer>
</body>
</html>
We also need to modify the controller again to load this view (users/index) and pass the $items value (array of user rows).
<?php

namespace AppControllers;

use AppControllersBaseController;

class Users extends BaseController
{
    protected $helpers = ['html'];

    public function index()
    {
        $model = new AppModelsUsers();
        $items = $model->findAll();
        return view('users/index',[
            "title"=>"Users", // page title
            "items"=>$items
        ]);
    }
}
The resulting page now looks like this:
Setup a Common Page Layout
Generally, we try to keep a consistent web application visual structure for all our views: the same header, menus, and footers, with small differences in the current context (eg: different title and menus). To make this work without repeating the same page structure inside each view (like in the previous user view), we use a common page layout.
A page layout may consist of a complete HTML page structure (with header and body) and sections to be filled with content, plus any global shared values to be used in the layout content. This is an example of base layout using the same structure we used before in home and users/index view, with a 'content' section, a variable $title (if no title is defined for the view, defaults to a generic application title 'My Web Application') and a set of header menu links to access the home and users routes. We can store this default layout in a layouts/ subfolder app/Views/layouts/default.php:
<!DOCTYPE html>
<html lang="en">
<head>
    <meta charset="UTF-8">
    <title><?php echo @$title?:'My Web Application' ?></title>
    <meta name="viewport" content="width=device-width, initial-scale=1.0">
    <link rel="shortcut icon" type="image/png" href="/favicon.ico"/>
    <link rel="stylesheet" href="/css/style.css" >
</head>
<body>
<header>
    <div>My Web Application</div>
    <nav>
        <a href="/" >Home</a>
        <a href="/users">Users</a>
    </nav>
</header>
<main>
    <?= $this->renderSection('content') ?>
</main>
<footer>
    Site Footer
</footer>
</body>
</html>
Now our view will use this layout calling first $this->extend('layouts/default') and then, defining the 'content' section using $this->section('content') to start, and $this->endSection() to end:
<?= $this->extend('layouts/default') ?>
<?= $this->section('content') ?>
    <h2>Users</h2>
    <?php
    helper('html');
    echo htmlTable($items,null,["border"=>1]);
    ?>
<?= $this->endSection() ?>
In the controller, we can pass the additional variabled needed for the layout (eg: the $title value) during the view() call in app/Views/user/index.php
        return view('users/index',[
            "title"=>"Users", // adding a page title for layout
            "items"=>$items
        ]);
The resulting view is basically the same, but now, we don’t need to rewrite the entire page layout in our view, only the content. We can also change our home view to use the same layout and reduce the view code only to the content (app/Views/home.php) and keeping the same result.
<?= $this->extend('layouts/default') ?>
<?= $this->section('content') ?>
    Main Page Content
<?= $this->endSection() ?>